The Story So Far...
In the May of 2000, a very nice man from an investment company gave me proceeds of a savings plan that I had been paying a small amount into for the last 12 years. The idea was always to use it to buy a car but the money fell well short of the Lotus Elise that I thought I needed! So my thoughts turned to doing another kit, but which one. After a few 'phone calls and a couple of days, the brochures began to arrive from Westfield, Caterhams, DJ Sportscars and others.
As luck would have it, the wife felt the need for retail therapy at Lakeside in Thurrock. Just a minute I thought, that's only 20 minutes from Harlow. So we set off. I bundled her out of the car at the shops (slowing only momentarily) and sped off round the M25 and up the M11 to 'the factory'.
The factory was not quite what I had imagined but there was the full set of DJ Sportscars' demonstrators ready and waiting. I was introduced to Gary who gave me the full 'Cooks' tour. It seemed to be what I was looking for. A kit that challenged the constructor without costing the Earth. I had long felt that Westfield had lost its way and alienated the 'hard core' builders by moving away from nuts & bolts builds to part finished quick assembly kits (and the price was climbing to Caterham levels). Gary then offered me a quick spin in the grey Rush. Quick of course is a gross understatement. I think it's true to say that Gary scares deposits straight out of customer's pockets - in the nicest way possible! There was no doubt in my mind; the cheque was in the post. Westfield has a policy of contacting people to whom it sent out brochures persuading them to a take the trip to Dudley. It was true to say that the atmosphere turned 'frosty' when I explained that I had placed an order with DJ Sportscars.
The kit was due for collection in the last week of October (coincidentally the same week as the conservatory - see Why am I building a Dax Rush), so I had to begin to source the necessary donor items.
I decided that the ubiquitous Sierra XR4x4 rear end was a 'must have' because of its disc brakes and limited slip differential. These are not lightweight items and the thought of heaving the complete Sierra subframe into my Fiesta or worse the wife's Mazda was too much to contemplate.
Back in the old days when kit cars were made of wood, hardy fools spent many hours clambering over wobbly stacks of rusty wrecks looking for that extremely important and equally rare flange grommet for their pride and joy. These days of course, the Internet revolution has even made it into the world of the scrappy. So a quick visit to 1st Choice's website meant that the next day I had a guy 'phone me to say that he could supply me with the full sierra XR4x4 subframe complete for £275, delivered including VAT. A little more than you should pay but far more convenient.
Trev's tip: - The wheel hub nuts can be real @#*~>s to shift with subframe out of the car (i.e. no gearbox or wheels to stop everything moving). If you are sourcing your rear end from a scrappy, why not ask him to loosen the hub nuts for you. He may be in a better situation to do this than you are.
Of course hindsight is 20:20. When my sierra back end turned up the first job was to extract the useful bits from the steel subframe. Trying to stop both the diff input flange and opposite wheel hub moving whilst trying to undo the other hub nut is not easy. After a couple of hours of trying, I was fast running out of tools that hadn't bent in the many attempts that failed to shift the thing. Eventually I borrowed a huge industrial sized stillson wrench from a plumber friend of my father's. I used this to stop the driveshafts from moving whilst applying brute force to the nut using the appropriate socket, ¾" drive bar and 4' scaffold pole! I can assure you that only then did they move.
Trev's tip: - Don't forget that the nearside hub nut is LEFT HAND THREAD (white nut insert and marks on the edges of the nut). The rest of the dismantling was fairly straightforward.
Next came the issue of refurbishment. I decided that, wishing to be as thorough as possible, I should replace the rear wheel bearings. It then only became clear that this was not really necessary once I had mullered the oil seals. Never mind, my local parts factor was going to get to know me very well anyway so we had to start somewhere! I think that my subframe came from a low mileage or recent XR4x4 as apart from day to day road grime etc. the parts were all in very good condition.
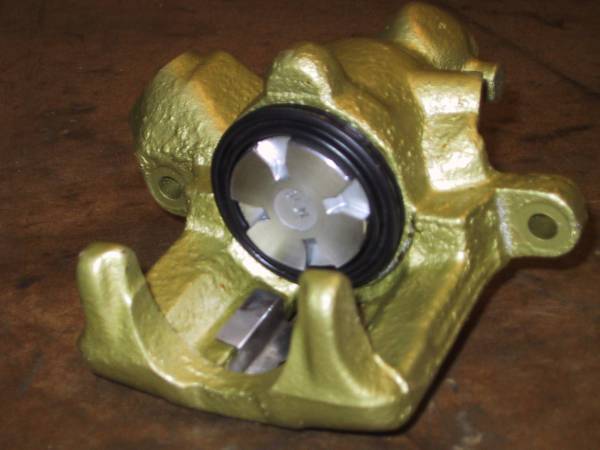
Other than the brake calipers, I decided that the rest of the items from the subframe need not be fully overhauled and set about cleaning and painting them.
The driveshaft CV joint boots were replaced although the originals looked OK (it's easier to do this now than when fitted to the Rush). A coat of Smoothrite and the driveshafts looked as good as new.

I decided to overhaul the brake calipers and bought the necessary kits. However, I forgot to order the kits that include new pistons and having damaged one of the originals during extraction, many thanks to Tim Hoverd for helping me out with those. Very fiddly job overhauling these yourself, especially getting the circlips back into the caliper barrel around the handbrake gubbins. In hindsight given the time and costs involved in doing this yourself, it would probably have been easier to go for exchange units. Even so, I think mine came out pretty well.
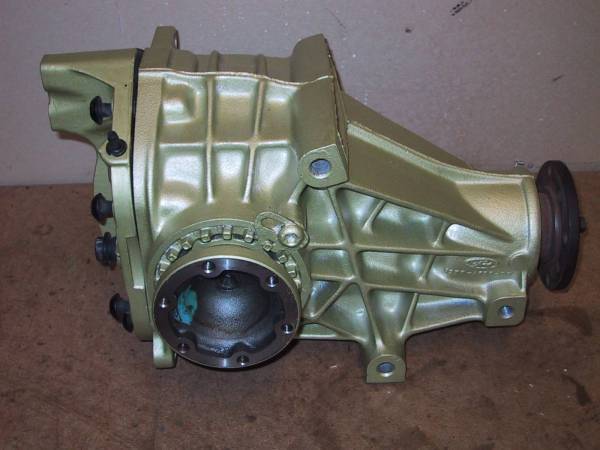
The differential looked excellent after an afternoon's work with a wire brush and a can of gold Smoothrite.
The first work to do on the chassis is to fit the floor panels. The supplied panels needed slight adjustment to make them a good fit but otherwise it's really just a case of drill & rivet. And boy o boy, there's plenty of rivets to go in. The floor panel are held in by long & large headed rivets that needed three pulls of the rivet gun to 'pop'. At 75 or so a side, the funny side soon wore off!
Trev's Tip:- To make life easier, buy or rent a concertina style or compressed air rivet gun to put the floor panels in.
AND DON'T FORGET THE WURTH!
The passenger footwell panel needed more work to make fit. Cutouts need to be made to fit the chassis rails. Unfortunately the chassis rails also prevent you fitting the panel without bending it into a crescent shape first. Provided you don't overbend the panel, it pushes back into shape without any signs of being deformed. I managed to muller my first attempt at this so when time comes to fit the drivers footwell end panel, I need to buy some more ally sheet. Gaps around the footwell panel were filled with Wurth.
As I had newly reconditioned all of the rear axle components, the next step was to instal them into the chassis. First up is the differential. Because mine was the smaller 7" type, Dax say they supply a spacer to make up the gap betwixt diff and chassis. What they actually supply in the 'Diff Bolt Pack' plastic bag are 22 large washers to judiciously place where needed. After much debate on the Se7ens list, the following was posted. I've followed this too but.....
This is for 7" diff:
Location....................Left Hand Side.................Right Hand Side
Bottom front...........70 mm Cap head bolt.......70 mm Cap head bolt
Bottom front...........1 washer outside...............1 washer outside
Bottom front...........5 washers inside .............5 washers inside
Top............................100 mm Cap head bolt....80 mm Cap head bolt
Top............................1 washer outside..............1 washer outside
Top............................6 washers inside..............no washers inside
Bottom rear.............80 mm Cap head bolt......80 mm cap head bolt
Bottom rear.............1 washer outside..............1 washer outside
Bottom rear.............no washers inside............no washers inside
In total 22 washers, 1x 100mm, 3x80mm and 2x70mm cap head bolts required. No 'normal' hex headed bolts used. This information is also contained in the parts list supplied with the fixings kit. I should have looked harder, although its not obvious and is difficult to de-cypher.
The differential mounting bushes pushed in rather easily with the help of some liquid soap. The 'A' frame bushes were a different matter. Fortunately we have a mechanical engineering workshop where I work so 10 minutes with the fly press saw them well and truly inserted!
Trev's Tip:- Remember to instal the 'A' frame ball joint into the chassis before fitting the differential, otherwise you'll be taking the diff out again.
Otherwise, the rest of the installation went well except for muddling up the driveshafts and trying to fit the nearside (shorter) shaft into the offside position! It took me at least an hour to fathom why the shaft was 10mm too short. A new slant on the 'offside trap'!
Trev's Tip:- Don't muddle up the driveshafts during reconditioning!!
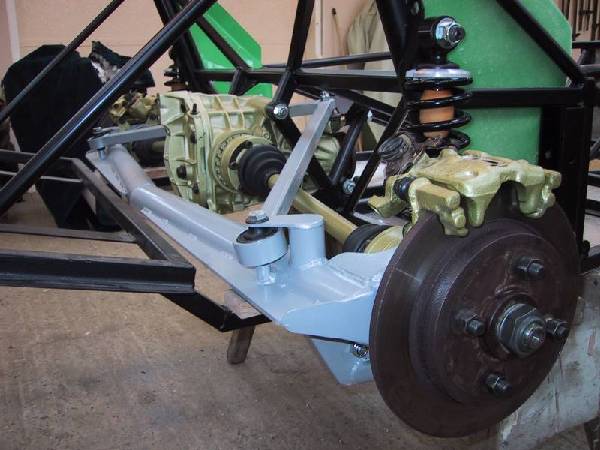
Trev's Tip:- By sliding the rubber bump stop down the shaft of the Spax damper unit you can fit the spring without any compression. Low spring rate at the rear, higher at the front.
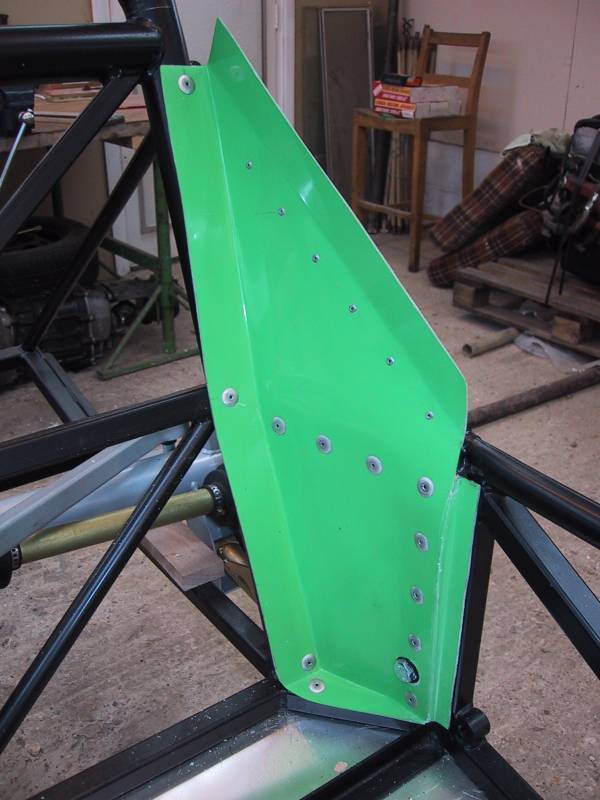
The manual says that the fibreglass internal rear panels are next to go in. Again there was some minor work to be done to improve the fit. A large hole also needs to be cut through the panel to accommodate the trailing arm fixing bolt. I used more of the large head rivets to fit this panel in order to spread the stresses of the rivet pulling the panel against the chassis rails. I didn't want the panel to crack or split so I used more rivets than would seem necessary.
Once the side panels were fitted the manual suggest fitting the rear bulkhead. I was sceptical about this since a) I didn't want to scratch it during subsequent work and b) it might get in the way. However, my head was overuled by my desire to press on, so it went in. When it came to fitting the rear rigid brakelines, I relaised that fitting the bulkhead made it really difficult to drill the hole to fit the brake 'tee' union!
Trev's Tip:- Fit the rear brake pipe 'tee' union before fitting the rear bulkhead