The Story Continued...
Late December, 2000
The next job was to fit the brake lines. So I opened and perused the green brake line kit supplied by Dax. Inside each rigid brake pipe is numbered and there is a sheet telling you where each number goes. However, there seemed to be something wrong. The sheet referred to lines running from rear hub to rear hub and there seemed to be far too many female fittings to couple with the Goodridge flexible hoses.
A quick mail to the Se7ens list had Dax replying saying that I was indeed short of two male to male couplings and these duly arrived.
January 6, 2001
I again set about trying to fit the lines but even with the additional parts, there was still something obviously wrong. It was time to call Gary at the factory. After some head scratching it became clear that I had been supplied with a Live Axle kit of brake pipes, and not a De Dion set!
Trev's tip:- The correct rigid brake pipe kit for a De Dion is part number DJ02 and for a live axle it's DJ01.
So no brake lines fitted that day which meant that I hadn't any excuse not to lay the floor tiles in the Wife's new conservatory!
Gary promised a new kit would be sent out and sure enough it arrived in time for the following Sunday.
January 14, 2001
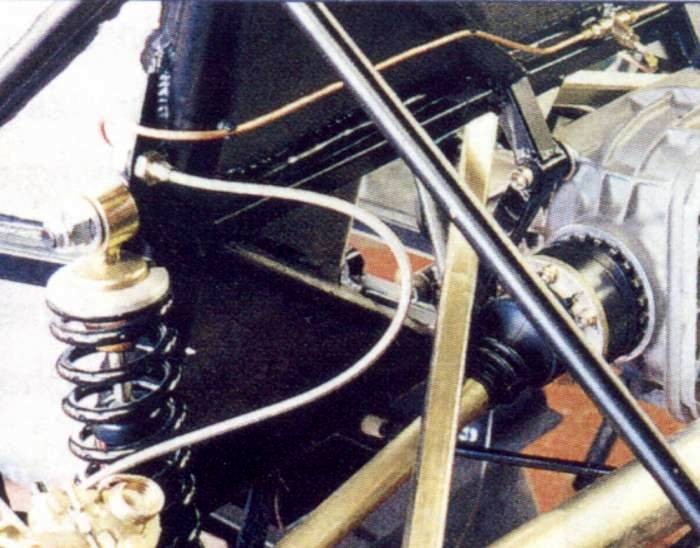
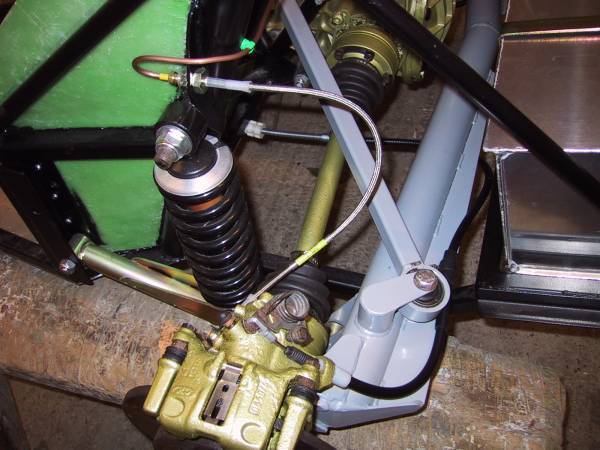
This time the kit, the sheet and the drawing all made perfect sense and the lines were fitted in a couple of hours. I personally think the clips supplied with the kit were A1 although others on the list may disagree. I fitted the rear lines from the 'tee' piece to the rear calipers in the same fashion as on the partially finished De Dion chassis at the factory. This seems at odds with other builds that I have seen. In my opinion, unless you mount them as per the Dax chassis, you run the risk of the flexible brake lines rubbing against the tyres and I'm sure Mr. SVA wouldn't like that!! I have included a picture in my gallery, scanned from the 'Dax Portfolio' (I hope they don't mind), illustrating this method of mounting the rear brake lines. The poor quality of the image is most likely due to my lack of experience in driving my scanner. I would appreciate any feedback from other builders as to the merit or otherwise of this approach.
January 16, 2001
The next jobs are the wiring loom and fuel lines.
I've ordered a generic Seven loom from Lightening Looms today but unfortunately they are currently quoting a 3-4 week delivery time. So I guess I will get on with the fuel system for now.
However, I'm having no end of troubling sourcing a suitable fuel injection pump, (Rover 60psi type). Demon Tweeks can only offer a 90psi unit which would then need a pressure regulator (too expensive an option) and 'til now, Europa Spares haven't replied to my e-mail request for parts information. I guess I will just have to try harder!
In the absence of either of the above, it looks like it's time to start sorting the engine by removing all the standard power-sapping Range Rover ancillaries it came with.
January 17, 2001
Ever the impatient one, today I ordered a fuel pump from Rimmer Brothers, together with pump resister. Cost £80.00 + VAT. I Still need to source a pre-pump filter with 12mm couplings and also the necessary 12mm and 8mm fuel hose. At least I should be able to get those from Europa or Demon Tweeks
January 21, 2001
Very little progress made this week due to ordering and waiting for the above fuel items to arrive from Europa. They finally replied to my e-mail but by then I had already telephoned them and ordered the bits and pieces. The parts arrived the very next day. Unfortunately, the person I spoke to at Europa, advised a different (and as it turns out incorrect) 'p'clip and clamp size for the FIP8 fuel pipe to the person who replied to my e-mail. Now I have to go through the process of returning the smaller incorrect items in exchange for the larger clips required. I've noticed that both the Europa and Demon Tweeks catalogues seem only give you the inside diameter of any hose that you might wish to order and forget to mention the overall external dimensions of the hose making ordering the correct clamps and clips rather difficult! Still the hoses that I ordered fitted the Rimmer pattern Rover pump perfectly.
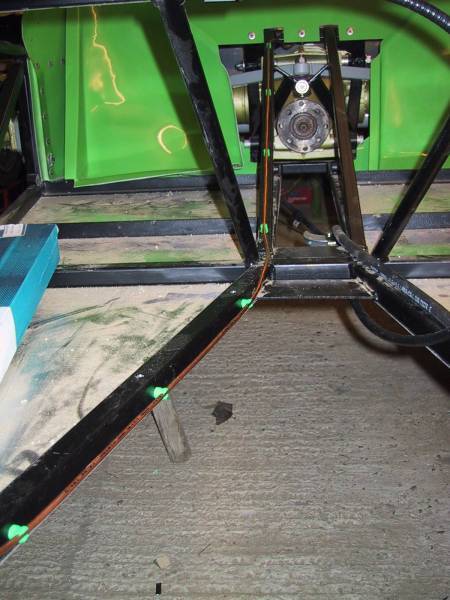
A somewhat retrograde step was also noted over the weekend. I'd run the brake line from the rear 'tee' piece to the pedal box area via the upper surfaces of the offside diagonal and lower forward running chassis members (contrary to the drawings in the manual). William Turner had mentioned fitting one of the internal GRP footwell panels on his website and whilst pondering the best route for the fuel lines (2x for EFI!) I'd thought I would sit mine in place to see how they fitted. Oh dear, the brake line fouled the panel. Fortunately the brake line is not fully installed past this point so I can a least reroute the line along the vertical face of the forward running chassis member fairly easily. This is rather annoying since it takes up valuable time which right now, due to family and work commitments, is something I have very little of.
January 28, 2001
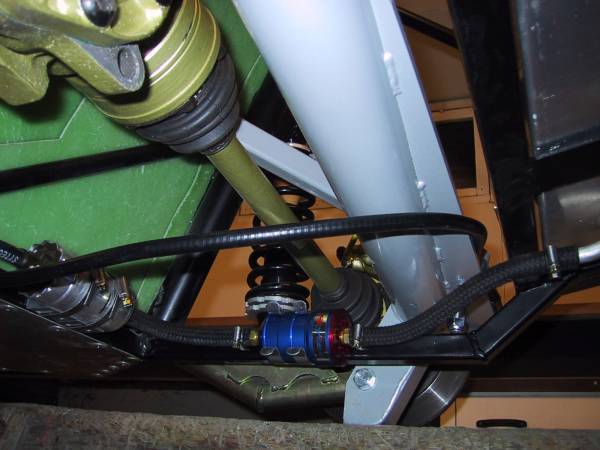
Finally managed to get all of the bits 'n pieces together to install the fuel lines. In addition to the pump from Rimmer Bros, I purchased a rather nifty pre-pump filter from Europa with the requisite 12mm unions. The filter is an anodized red and blue affair from Bullet Motorsport and adds an air of 'professional motorsport' to the rear of the chassis.
Fitting the filter was easy since it came with its own clips. The pump was a different matter needing a couple of small steel angle brackets to be riveted to the chassis rail to support it. I used two 70mm diameter worm drive hose clips to clamp the pump and fixed these to the chassis by placing them behind the brackets prior to riveting. The pump, filter and tank were all connected with 12mm i.d. cotton overbraided hose and worm drive hose clips.
I'm still unsure about the best route for the two fuel pipes along the tunnel. I don't want to run into problems with the pipes fouling the bellhousing or gearbox. Having already had to go to the lengths of rerouting the rigid brake lines. So in order to give myself more thinking time, I decided to fit the handbrake cables. These went in easily with the exception of having to file out some of the powder-coating from the underside chassis brackets to get the cables to fit. I fixed the rear cables to the de-Dion bar using 'p' clips.
I still had not made up my mind about the fuel pipe routing after fitting the handbrake cables so I decided to fix the tank in properly. I drilled the holes for the self-tapping screws and just to make sure that the holes were the right size, I screwed one of the screws in. It was a snug fit and so I took it out. It was then that my Dax took its first serious revenge on its creator. By testing the screw's fit, the screw had pulled a 'thread' of metal out of the hole. Without thinking, I tried to wipe it off with my fingers. Result? Large quantities of blood oozing from several fingers. This put a bit of a damper on the day. However, after some TLC from the Missus, it was back to work to finish the job.
Trev's Tip:- Don't be tempted to drill the holes for the offside fuel tank bracket at the ends of the tank carrier cross member, the bracket will foul the fuel gauge sender unit. And fill the diff with oil prior to fitting the tank, otherwise access is somewhat restricted.
Whilst on the subject of fuel gauge senders, the Dax supplied unit seems to be too long for the tank. When the tank is full, the gauge will show full, when the tank is empty, the sender float will hit the bottom of the tank with a quarter of its travel still to run. In other words, the fuel gauge will never read less than a quarter full (perhaps we should look optimistically at this feature, given the price of fuel and running a V8!). I think I will shorten the float arm once I have got the fuel gauge to hand to do some tests.
It's very close to 'engine in' time now so I was horrified to learn from the list that a pair of engine mounts will set me back £100 or so. This, along with my throbbing fingers, has depressed me somewhat. Still, felt much better after taking a large disc cutter to the donor Sierra outside and chopping it into small enough pieces to take to the tip in a borrowed Transit. Note:- Two trips required! Still, whilst I am sourcing the engine mounts, there's time enough to crack on with stripping/cleaning the engine & gearbox and sorting out what I need to order in terms of flywheel, clutch and accessories etc.